-
What you'll need:
- Solar Panel (either a kit or at least the panel, wiring, and a charge controller)
- Box (Should be big enough to bolt the panel to)
- Wiring Kit (should have strippers, crimpers, and various terminal ends)
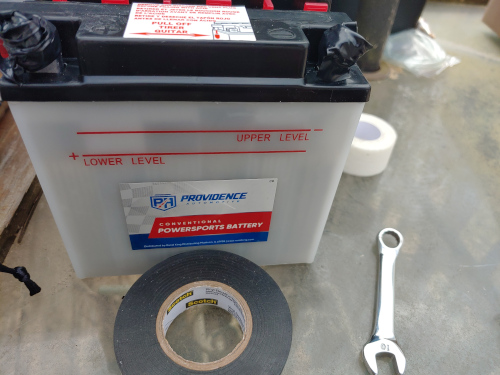
- Battery (should be compatible with the panel you got)
- Electrical tape/various hardware for mounting
- Multimeter or Voltmeter (you will need it for testing but you should not need one in the kit)
- Silicone (this is optional to help seal the container )
What to do:
!!!~ I should not have to say this but I am going to anyway, battery acid can be dangerous if it gets in your eyes or on your skin. Take whatever level of precaution you are comfortable with. ~!!!
*This tutorial requires a modicum of electrical knowledge. This is doable by 99 out of 100 folks but I wanted to give you a heads up. *
*You may want to hook the lights to the battery directly to make sure that it will power them properly before starting.*
*Wire this bad boy up any way you like but it is a good idea to use wiring that can be hooked up and unhooked quickly and easily; use quick disconnects. Many charge controllers have to be hooked up in a certain order or they will throw an error so you may need to unhook things and then put them back together or disconnect a battery that is getting hot.*
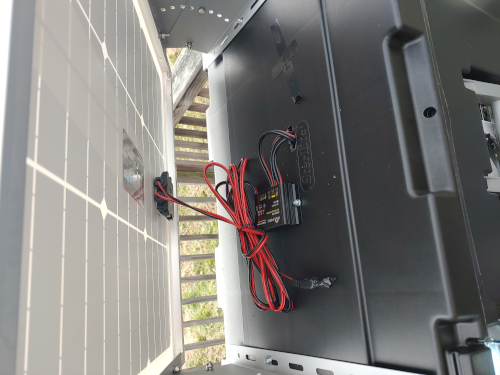
> Mount panel to lid- If you got a kit like I did it should come with mounting brackets like the one in the pictures here. If you are piecing it together then you may need to get creative with the mounting but the general idea is to mount it to the lid for faster deployment and make it easier to carry, you do not have to permanently mount it to the lid.
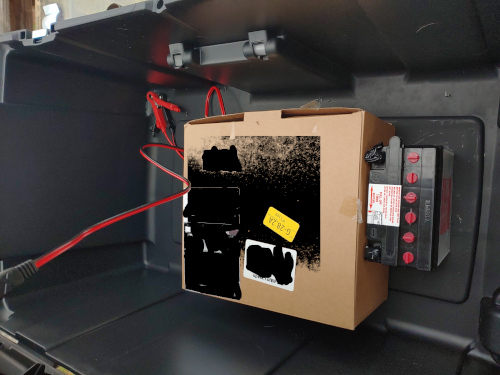
>Mount the charge controller- I put mine between the panel and box, the brackets made this a really convenient place to run wiring. If you are putting the panel directly on the lid you will want to mount it elsewhere. Inside the box on one of the sides might be a good idea. We just want to make sure that it is secure, off the ground, and positioned so you can read any display or status lights.
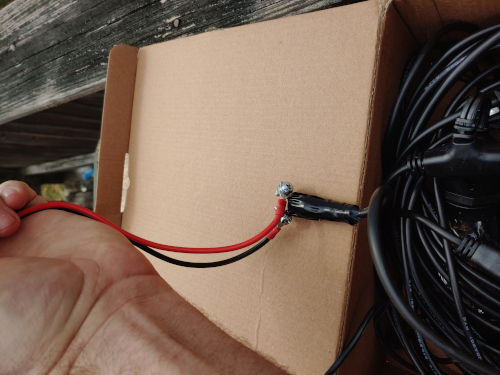
>Wire up the lights- The lights that I chose worked great, recommended for sure. They are outdoor lights so they are robust and water proof not counting any modifications that may happen down the road. They are also 12v lights so they work perfectly for this but they come with a plug that converts wall power to 12v so you can use them normally or in this kit or in your car or anywhere really. Probably going to get a second set. Anyway, what you want to do is figure out which side of the lights is positive and which is negative. Depending on your light setup you may have to get creative here. The connector on the light set that I got is keyed (meaning that it can only be plugged into the wiring harness 1 way and I do not have to wonder what side is up) so I was able to simply plug the power converter into the wall and test with the multimeter. I am not an electrician and can not give much advise on this, that is just what worked for me. I am open to emails and discussions about it though if you are stuck. The main thing here is that we want to figure out how we are wiring the lights to the charge controller and then doing it.
>Wiring up the battery- This is pretty straight forward, positive to positive and negative to negative from the battery to the charge controller. If you have not yet, this is probably the most important place to use those quick disconnects. One thing you may not have done before that we are doing in this step is baking the battery. Pretty simple and if your battery does not come with a jug of acid then you do not have to worry about it at all. If you got a cheapo motorcycle or ATV battery like I did you may have to pour the acid into it yourself. Just be careful and follow the directions that came with the battery, you'll be alright.
>Test test test- Ok we hooked it up and ... nothing. No worries, we get to figure this out now rather than later when you need the lights but it is dark and harder to troubleshoot. First thing that I ran into was that my charge controller wanted things hooked up in a certain order so read the manual! If yours is missing you can usually find one on the internet, maybe try duckduckgo.com or searx, google is evil. What if that didn't work? Hook the lights directly to the battery, if they do not light up you can try hooking them up to a known good 12v source or put a multimeter on the battery. If they do light up the issue is the charge controller. The last thing you want to do is test the panel. To state the obvious, this should all work without the panel, it is just there to charge the battery. To test it hook everything up while it is bright and sunny then point the panel in the direction of the sun. Now when you test the battery it should be reading a bit over 13v. If it is more than 14v there may be an issue with the charge controller, you do not want to overcharge the battery.
If you have questions or found this helpful (or maybe you have a correction) you can drop me an email at tastybleach@airmail.cc thanks for taking a look!
In the pictures you can see that I still have some work to do. I need to add bolts to the bottom of the brackets for better stability as well as running silicone around the holes to help keep water and dust out. I also want to add a cigarette lighter power outlet like you would find in a car so we can charge devices. Note that I left those screws that hook the lights to the charge controller exposed, I will be taping those up if I use the kit but after I add the power outlet I will find a more permanent solution like silicone or shrink wrap.